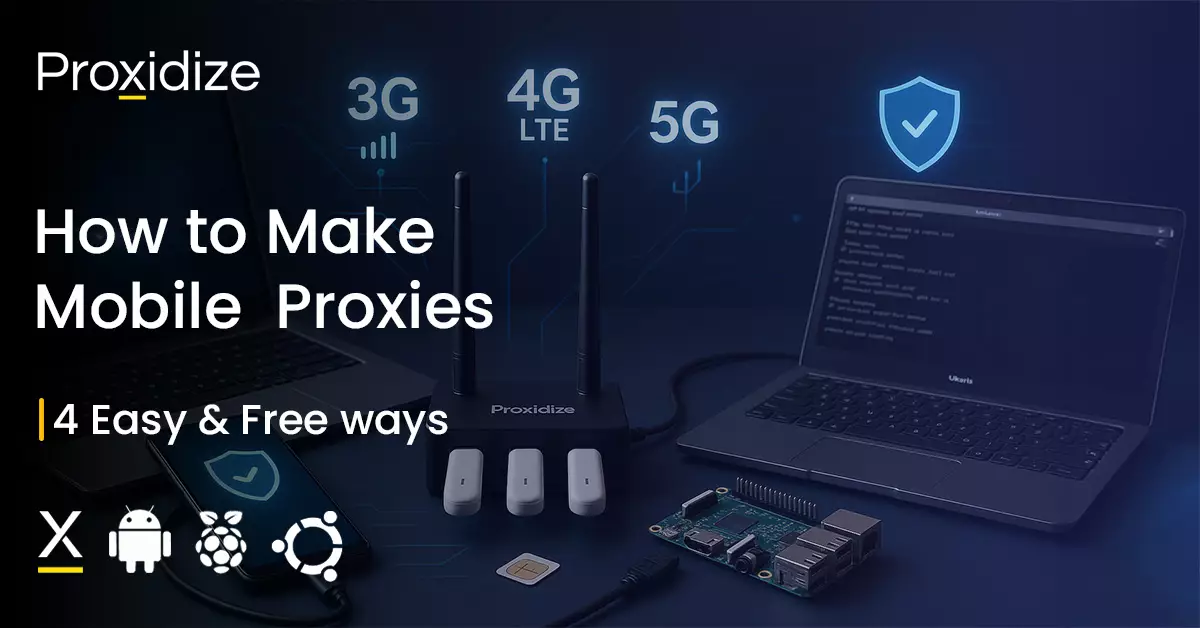
In this article, we’ll be taking you through step-by-step guides on how to make mobile proxies that use 3G, 4G LTE, and 5G technology for Android devices, Proxidize kits, Raspberry Pis, and Ubuntu devices.
Creating your own mobile proxies has many advantages, including:
- Significantly lower costs, averaging less than $1/GB or $50/proxy/month
- Much more private, unlike when using proxy providers
- Top-notch security, when creating your own mobile proxies you can secure your own network without worrying about third-party leaks
This article will address the technicalities of setting up your own mobile proxy, including any code you might need along with detailed instructions. It will also cover non-technical points of how to source SIM cards and set your mobile proxies up so they’re built to last.
This article will only use software tools that are 100% free, using the Proxidize Cloud Platform to make our mobile proxy and building one from scratch using only open-source and free tools.
We will explain how to make mobile proxies with four different platforms:
- Android phones
- Proxidize hardware kits
- Raspberry Pis
- Ubuntu devices
Step #1: Understanding How Everything Works
The Basics
Making your own mobile proxies is the process of creating an intermediary device that hosts your proxy server and connects to the cellular network via 3G, 4G LTE, or 5G. The intermediary device routes all your connections to the internet via the cellular connection, thereby giving you a mobile IP address when you use the proxy.

It’s that simple. You need a device that can run some software, host your mobile proxy, and can connect to a mobile network. Once you have that device, all you need is your choice of software and to make sure that everything is connected properly.
With the right tools, the entire process shouldn’t take more than a few minutes. The easiest way to do it is with an Android phone, but there are other devices you can use too, as we’ll see.
That was the short version. If you don’t care about the underlying technologies and want to start learning how to make mobile proxies as quickly as possible, you can skip on to the next section.
The Details
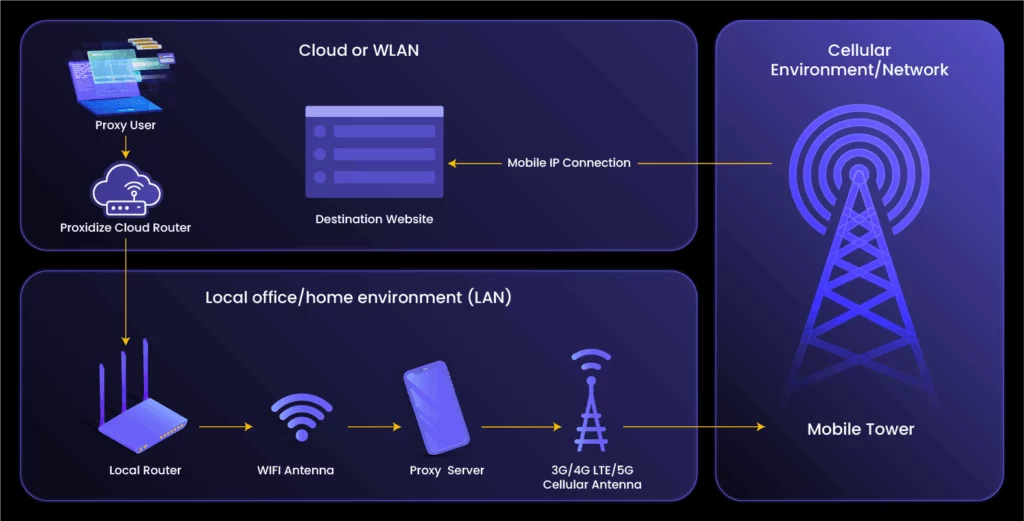
The diagram above, while generally true, is not entirely technically accurate. It skips over a few important systems that we’ll touch on next. A good mobile proxy platform like Proxidize can make these systems nearly invisible, but understanding the basics helps you truly appreciate the engineering behind tackling these complexities.
To more accurately illustrate the path a request takes from your device to a target website, we’ll use the following example: We’ll use an Android phone connected to both the mobile network and the office WiFi, together with the Proxidize Cloud Platform. The same principle remains the same even when using a completely DIY approach.
Let’s say I’m a proxy user with a Google Pixel that I’ve turned into a mobile proxy using the Proxidize Cloud Platform. I want to scrape a target website using my proxy, and I know my scraper is sitting on a public cloud like Azure or AWS.
The connection flow will look like this:
- I program my scraper to connect to my mobile proxy at 192.0.0.1:2005. The scraper will start sending all the relevant traffic to that proxy.
- The proxy traffic will first hit a Proxidize Cloud Router server, which will know to route this traffic to my phone based on the port and other parameters.
- My phone is connected to both the office WiFi and the cellular network through the Proxidize WiFi back end feature. This means that the traffic sent from the Cloud Router to my phone will first hit my office router, as I’m on the office LAN. From there, the office router will know to send my proxy traffic to my mobile phone, based on NAT rules.
- The proxy server on my phone will be listening to the specified port and will know to send any incoming traffic from that port. As the traffic hits my phone, it will be sent to the target website strictly via the mobile connection while also maintaining full anonymity of the source IP.
- Via the cellular network, the traffic will then travel from the phone to the mobile carrier’s CGNAT router. That router assigns the traffic a public mobile IP address and sends it on its way to the destination website.
Routing traffic like this with Proxidize only adds 5–20ms of latency, despite a lot of traffic experiencing multiple hops. It also barely effects the speed of the proxy. During testing we found that connecting through a Proxidize mobile proxy on a phone is sometimes even faster than connecting directly from the phone itself.
When developing the Cloud Platform and Cloud Router we were — and continue to be — obsessed with speed and latency and we always made sure to minimize their impact. At the same time, we developed a worldwide network of cloud routing servers, on-par with the biggest cloud delivery networks like those of Cloudflare or Netflix.
This is what we just described above looks like in a diagram:
There are many different ways to achieve the same thing. These are a lot simpler but will also have some limitations. Some examples include:
- If your proxy user is connected to the same local router, you wouldn’t need to connect to the Cloud Router first. You could just connect to the local NAT IP of the mobile phone. This only works if both the proxy client and the phone are connected to the same local router.
- You could also skip the Cloud Router completely by opening ports directly on your local router via port forwarding. A big caveat, however, is that if you don’t know what you’re doing you can potentially compromise the security of your entire network.
- You could skip the local network entirely and route both incoming and outgoing connections via the cellular connection. This could create a few issues; first, your effective speed would be halved, as both incoming and outgoing traffic has to pass through the same network interface, and second, you’d consume twice the amount of data.
Now that we understand the technologies and the details, let’s continue with the step-by-step guide for how to make mobile proxies using an Android phone, Raspberry Pi and USB modems/dongles, or any Ubuntu device.
Step #2: Choosing Your Hardware
To make a mobile proxy server you have a few hardware options to choose from. Each comes with their own pros and cons which we’ll lay out for you. Your choice of hardware will depend on your needs, use case, and personal preference.
Android Phone
| Pros | Cons | Reason to Use | Average Speeds | Best For | Other Components |
| • Easiest to install • Easiest to maintain at a small scale • Best signal reception and speeds • Supports 5G | • Difficult to scale beyond 10 phones • Difficult to maintain at scale | Easy to acquire and use | 10–100 Mbps | • Small to mid-scale account management • Very light scraping with few IPs • Any use case that prioritizes speed over number of IPs | N/A |
Proxidize Hardware Kit
| Pros | Cons | Reason to Use | Average Speeds | Best For | Other Components |
| • Easy to scale up to 100+ proxies • Purpose-built for mobile proxies • Modular kits that fit any needs • Higher redundancy • Lower cost than latest Android phones | • Requires a multiple components being put into a kit and not just a standalone phone • Slower than the latest Android phones • Slightly more technical setup process • Longer setup process • No 5G support yet | Easy to scale & greater redundancy | 10–50 Mbps | Large scale business projects. | Will require a full kit, including a Proxidize server, USB hub, and USB modems. |
Raspberry Pi
| Pros | Cons | Reason to Use | Average Speeds | Best For | Other Components |
| • Easier to setup and configure than Ubuntu • Smaller size factor than Ubuntu devices | • Requires a multiple components being put into a kit and not just a standalone phone • Slower than the latest Android phones • Slightly more technical setup process • Longer setup process • No 5G support | More scalable than phones with technical knowledge | 10–50 Mbps | • Tech enthusiasts and DIY lovers • Users who live in countries with import restrictions | Will require a full kit, including a Raspberry Pi, USB hub, and USB modems. |
Ubuntu Device
| Pros | Cons | Reason to Use | Average Speeds | Best For | Other Components |
| Easier to scale than a Raspberry Pi | • Requires multiple components being put into a kit and not just a standalone phone • Less scalable than Proxidize hardware kits • More difficult and technically involved setup process • No 5G support | Technical knowledge required | 10–50 Mbps | Same as the Raspberry Pi but for users who either already have a device they can use and don’t want to invest in a new one, or users who want something a little more scalable. | Will require a full kit, including an Ubuntu device, USB hub, and USB modems. |
To illustrate how each option works at scale, let’s show you what each one would look like if we wanted to create five mobile proxies:
- For Android phone:
- Five supported Android phones running Android 7.0+
- Five SIM cards with active data plans
- For Proxidize hardware:
- A Proxidize SX2 Mini Server
- A Proxidize HX1 USB Hub
- Five Proxidize MX2 USB Modems
- Five SIM cards with active data plans
- For Raspberry Pi:
- A supported Raspberry Pi
- A supported powered USB hub
- Five supported model USB modems
- Five SIM cards with active data plans
- Ubuntu device:
- An x86 laptop or computer running Ubuntu
- A supported powered USB hub
- Five supported model USB modems
- Five SIM cards with active data plans
Based on the above, we can conclude the following:
- Most people will find it most convenient to use Android phones, as they are the easiest to use, the easiest to source, and won’t require any technical knowhow to set up. Once you start needing a lot of proxies, however, this setup will not be very scalable.
- Proxidize hardware kits are more appropriate if you’re willing to sacrifice the higher speed of Android phones in exchange for greater scalability. This is especially true if your proxy farm is critical infrastructure for your business.
- If you have some technical knowledge and want a more DIY approach, purely for fun, a Raspberry Pi with USB modems is the best choice for you.
- If you only have an old x86 server, computer, or laptop with enough resources, you can install Ubuntu on it and use it with USB modems just fine.
The environment in which you host your mobile proxy server will have several influences on your setup that you’ll need to consider:
- If speed is important but you only have a weak or slow signal, Android phones can offer better speeds than other options, depending on the signal profile. If the network is congested, your connection may be bottlenecked to less than 10 Mbps, in which case there would be no speed difference between a phone or USB modem.
- If redundancy is important, the Linux-based approach with a small number of modems spread over several locations is a good idea, as at least some of your proxies will remain online, even in the event of local power or signal outages.
- There are always a limited number of mobile IPs available to each carrier in a region. In some places, like the United States, those IPs are divided up by area, city or state.
What this means for us is that there is an upper limit to how large you can scale up your proxy infrastructure within a region. We recommend you maintain no more than 80 cellular devices at a single location. Otherwise, you risk hitting an IP bottleneck and getting multiple duplicate IPs on difference devices.
If you decide to go with a Linux-based system, it’s important to understand that you’ll have to contend with some limitations. You’ll have to use specific types of devices, Raspberry Pis, USB hubs, and USB modems. Not all of them are compatible.
These limitations are:
- Limited modems per device; any USB-enabled device can only support a limited number of USB modems/dongles:
- Proxidize SX2: 20 modems
- Proxidize SX4: 80 modems
- Raspberry Pi: 5 modems
- Average Ubuntu device: 20 modems
- Supported USB modems:
- Any Huawei HiLink model
- Any ZTE model
- USB hub:
Any powered USB 2.0 or 3.0 hub that supports 5V and 0.5A output per USB port.
The hub must have its own external power source, as the main USB connection is only enough to power a single modem. - Raspberry Pi; minimum of 5GB RAM and 16GB storage:
- Raspberry Pi 5
- Raspberry Pi 5
- Any Ubuntu-based device:
- Modern, powerful x86 CPU
- 4GB RAM
- 16GB free storage
USB modems/dongles are generally designed specifically for the cellular network of the country in which they’re sold. If you decide to import modems from abroad, always start with a test batch and choose an unlocked modem. Note that some third-party USB modems require extra configurations to make them work, such as having to change the admin password on the modem’s web UI or having to manually set the cellular APN.
Additionally, other Raspberry Pi-like ARM devices, such as the Orange Pi may or may not work as proxy servers; we haven’t extensively tested them. That’s why we recommend you have a x86 CPU if you decide to go with an Ubuntu device.
Now that we’ve selected the hardware we’re going to be using, let’s move on to the next step — installing and configuring our new proxy server.
Step #3: Creating Your Mobile Proxies
In this section of our guide on how to make a mobile proxy we will cover creating the proxies themselves for each of the aforementioned hardware. We’ll be using the Proxidize Cloud Platform, which is free, and the quickest way to accomplish our goal. We’ll also include a section on how to create a mobile proxy using open source tools such as 3proxy or Squid proxy.
Creating Mobile Proxies Using an Android Phone
Using a mobile phone to create a mobile proxy is the easiest way to make one. Once you have an Android device and SIM card, it takes less than 5 minutes to get started.
In order to turn our phone into a mobile proxy, we’ll need to:
- Create a free account on Proxidize, signing up on https://app.proxidize.com/
- Download the Proxidize Android Agent from Google Play.

- Open the app on your phone and open the Proxidize Dashboard on a second device. For this guide we’ll assume you have a computer.
- From your phone, you will need to give your phone a name. Make sure to use something descriptive such as “Model #Number”, e.g. “Samsung No. #21”.
Note that the actual model of the phone will be automatically detected and displayed on the dashboard once you’ve finished onboarding your phone. - With the app open on your phone and the Proxidize Dashboard open on your computer, you will see a QR code icon on both your dashboard and your phone.
Click the QR on your dashboard, which opens a unique QR code, and then scan it with your phone by pressing on the QR icon.
- The app will need some permissions. These are:
- Ignore battery optimization: This is needed to ensure the proxy remains accessible even after you turn off your screen.
- Default assistant: This is needed for the IP rotation feature. This lets you change the proxy’s IP address manually from the dashboard, via API, or automatically after a predetermined time interval.
- Allow runtime permissions: This is needed for the app to have access to information about your connection, which will then be used in configuring the proxy.
- SMS permissions: These are optional and only needed if you want to be able to read or send SMS messages from your Proxidize dashboard.
- Once you have given the app all the needed permissions, click continue.
- You will now see a screen that reads: “Creating Host”. Wait until that’s finished, then:
- Press and hold the “Connect” button for around 5–30 seconds. Wait until you see a “Connection request” popup.
This is extremely important and without it, the proxy will not work. - Approve the request by pressing “OK” and wait another 5–15 seconds for the app to finish connecting.
- Return to your Proxidize Dashboard. Go to Hardware > Endpoints and there you will see your phone. Once you expand the row you will see your new mobile proxy.
- Press and hold the “Connect” button for around 5–30 seconds. Wait until you see a “Connection request” popup.
Sometimes it takes a minute or two for all the Proxidize backend processes to connect. If your proxy doesn’t immediately work, please give it a minute.
That’s it! You now have your very own mobile proxy on your Android phone. If you want more proxies you can connect more phones.
Creating Mobile Proxies Using a Proxidize Kit
At Proxidize we provide purpose-built proprietary hardware, designed specifically for mobile proxies. Its biggest limitation is that our hardware doesn’t support 5G yet.
Proxidize hardware was built for businesses who need redundancy and ease of mind. By sourcing your infrastructure from a single supplier you can easily fix and replace anything if it breaks. We even credit you for any downtime that occurs due to hardware issues.
The same is not true if you’re using third-party hardware. If something goes wrong at a hardware level, all we can do is tell you to reach out to the hardware vendor.
In order to create a mobile proxy from Proxidize hardware, we’ll need to first order a kit. Delivery within the United States and the EU is typically within 5 business days. If you have specific requirements, you can assemble your own custom kit.
Before your hardware arrives, it’s important to start looking into SIM card/data plan options:
- USA: T-Mobile or any carrier that works best in your area
- Note: Proxidize hardware has limited Verizon support
- Outside the US: Whichever carrier is most appropriate for you
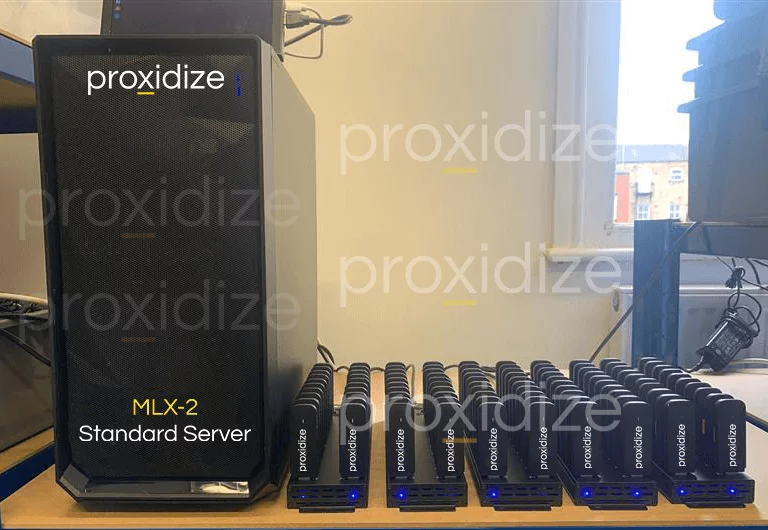
Once your hardware has arrived and your SIM cards ready, assemble everything by simply connecting everything to power, inserting the SIMs into your USB modems carefully, and plugging them into your USB hub. Once assembled everything should look like this:
Make sure you have the necessary peripherals:
- An HDMI-capable screen
- USB mouse
- USB keyboard
Next, connect the peripherals to your Proxidize hardware kit and connect your server to your router with the provided ethernet cable.
Power up your devices. You will be greeted by either immediate access to the desktop or by a login screen. The default password is “123456”, which we urge you to change once you log in.
Locate the terminal by clicking on the bottom left icon and searching for “terminal”. Then input the following:
sudo su
apt install curl
curl -fsSL pxfile.com/install_cloud | bash
This logs into the root user, installs cURL, and installs the Proxidize Linux Agent.
Alternatively, you can use SSH to connect to your Proxidize server and install the Proxidize Linux Agent remotely.
Once the device is powered up, use this guide to connect to your server with SSH.
For the Proxidize SX2 Micro Server, the default username is: proxidize
The default password is @_default$ (which you should change after first login).
Once you have connected to your device, follow the instructions as detailed above.
The next step is to onboard your device to your Proxidize Cloud Dashboard.
- Open the Firefox browser on your Proxidize server.
- Type in “localhost” or open the local IP you see in the terminal from any device connected to the same router. You will be greeted by this page:
- Login with admin:admin
- Agree to EULA by scrolling to the bottom of the page, ticking the checkbox, and clicking “continue”.
- Change your default password. It is very important you do not forget to do so.
This login screen will not be publicly accessible and the username and password will not be the same as your login details for the Proxidize Cloud Platform. These settings are entirely unique to this specific device. - Configure your local options:
- Host Nickname: This will be the name you use to identify your device on the local dashboard. Name it something descriptive that helps you remember what device this is in case you have multiple, such as “Office SX2 #1”.
- Pin Code: Open your Proxidize Cloud Dashboard, locate the PIN at the top right menu, and type that into the “Pin Code” field.
- Enable Cloud Router: If you want to be able to use your proxies remotely, you can enable the Proxidize Cloud Router.
We recommend you keep this enabled. - Static IP: This is only necessary if your device is going to connect via static IP instead of DHCP. If you don’t know what that means, please keep it unchecked.
- Host Nickname: This will be the name you use to identify your device on the local dashboard. Name it something descriptive that helps you remember what device this is in case you have multiple, such as “Office SX2 #1”.
- A “Successfully onboarded” notification should pop up and your local proxy dashboard will load.
We recommend using the Cloud Dashboard, which is more secure than this local dashboard.
You can see your new server on the Proxidize Cloud Platform by going to Hardware > Hosts. - All your attached USB modems will be visible from Hardware > Endpoints. From there you will also find all your proxies and you can start using them immediately.
If you haven’t plugged in your USB modems, now is the time to do so. Modems can take up to 2 minutes to appear on the dashboard.
To copy your proxies you can expand the row and click on the copy icon.
Creating Mobile Proxies Using a Raspberry Pi
The Raspberry Pi is a small but powerful device; a good candidate for mobile proxy hardware. Of the many Pi models, two meet the requirement of 4GB RAM and 16GB of free storage, but we only recommend one: the Raspberry Pi 5.
With the following steps we can make a mobile proxy from a Raspberry PI and USB modems/dongles. First, let’s prepare SIM Cards/Data Plans:
- USA: Proxidize Connect Data Plans starting at $39.99/SIM/month for unlimited data (terms apply)
- USA: T-Mobile or any carrier suitable for your area
- Note: Proxidize hardware has limited support for Verizon
- Outside the US: Choose the most appropriate carrier for your region
Next, we’ll need to assemble our hardware:
- Raspberry Pi: Order a Raspberry Pi with 4 GBs of RAM and a high quality SD card with a minimum of 32GB of storage. The quality of the SD card is important. For our tests we used a SanDisk Extreme Pro.
- USB modem: Order a USB modem like the Huawei E3372h or similar. Make sure it’s compatible with your local bands/frequencies.
- You will need a high quality powered USB hub if you plan to use more than one proxy. We used Orico in testing.
- Peripheral devices: You will need a USB mouse, USB keyboard, ethernet and HDMI cables, and an HDMI-enabled screen. Connecting your Raspberry Pi to your internet via an ethernet cable is also recommended, but WiFi should work fine if your router is close by.
Now it’s time to install our Raspberry Pi OS by following the official guide. Make sure you use the 64-bit version of Raspberry Pi OS.
Assemble everything by plugging it all in, inserting the SIMs into your USB modems, and plugging them into your powered USB hub.
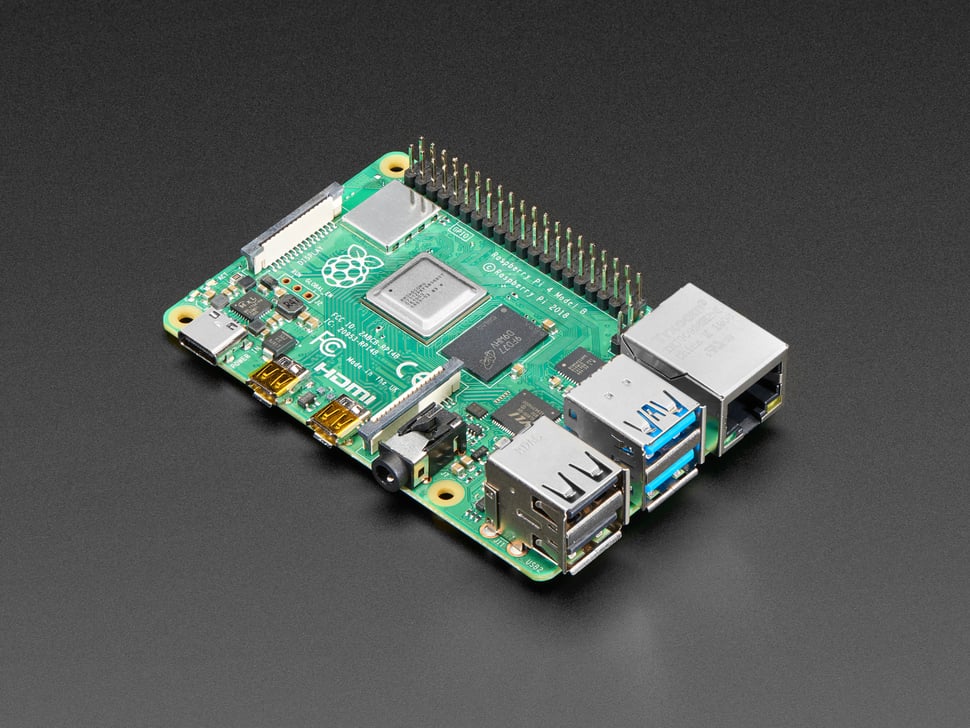
Connect your peripherals to the Raspberry Pi and connect your Raspberry Pi to your router via ethernet or WiFi.
Power up your devices. You will either have immediate access or be shown a login screen.
Locate the terminal and input the following:
sudo su
apt install curl
curl -fsSL pxfile.com/install_cloud | bash
This logs into the root user, installs cURL, and installs the Proxidize Linux Agent. The agent is responsible for the local configuration of the device.
Note: This step can take up to 15 minutes depending on your connection speed.
To install the Proxidize Linux Agent remotely, connect to your Pi via SSH.
On a Raspberry Pi, the default username is often: pi
If unchanged, the default password is raspberry
Keep in mind that Raspberry Pi OS disables the SSH server by default, so you’ll have to enable SSH first, if you haven’t already done so. Once it has been enabled, you can edit the config file which is usually located at etc/ssh/sshd_config.
Now that you have connected to the device, input the terminal commands detailed above.
It’s time to onboard your Raspberry Pi to your Proxidize Cloud Dashboard:
- Open the Chromium browser on your Raspberry Pi
- Type in “localhost” or open the local IP you see in the terminal from any device connected to the same router. You will be greeted by this page:
- Login with admin:admin
- Scroll to the bottom of the page and agree to EULA.
- Change your default password. This step is very important.
These credentials are different to your Cloud Platform credentials and are unique to this device. - Configure your local options:
- Host Nickname: This is the name that will appear on the dashboard for this device. It helps to name it something descriptive to help you identify it, such as “Raspberry Pi #1”.
- Pin Code: Open your Proxidize Cloud Dashboard, find the PIN in the top right corner of the screen, and type that into the “Pin Code” field.
- Enable Cloud Router: You can enable the Proxidize Cloud Router to use your proxies remotely.
We recommend you keep this enabled. - Static IP: This is only necessary if your device is going to connect via static IP instead of DHCP. If you don’t know what that means, please keep it unchecked.
- A notification that says “Successfully onboarded” will appear and your local proxy dashboard will load.
The Cloud Dashboard is more secure than this local one, and we recommend you use that instead.
You can see your new server on the Proxidize Cloud Platform by going to Hardware > Hosts. - All your USB modems will be visible from Hardware > Endpoints. You can also find all your proxies there and start using them immediately.
If you haven’t plugged your modems in, do so now. They can take up to 2 minutes to appear on the dashboard.
Expand the row and use the copy icon to copy your proxies.
Creating Mobile Proxies Using an Ubuntu Device
Any x86 Ubuntu machine running a 64-bit Ubuntu 22.04 can be used as the hardware for a mobile proxy server. The Proxidize Linux Agent can be installed on any computer that meets those requirements.
Let’s discuss our plan for how to make mobile proxies using an Ubuntu device and USB modems/dongles.
First, obtain SIM cards with a data plan:
- USA: T-Mobile or any carrier that works best in your area
Note: Proxidize hardware has limited support for USB modems. - Outside the US: Whichever carrier is most appropriate for you
Next, let’s assemble our hardware. We’ll need:
- Ubuntu device: Any device you use must meet these minimum requirements:
- x86 64-bit modern CPU
- At least 4GB of RAM
- At least 16GB of available storage
- USB modem: Order a local support USB modem such as a Huawei E3372h or similar. Make sure it’s compatible with your local bands/frequencies. If you’re ordering them from another country, make sure they are not subject to import restrictions.
- If you need more than a single proxy, then you need a high-quality powered USB hub. Any reliable model from Orico should work, but make sure it is an externally powered model.
- Peripheral devices: You will need a USB mouse, USB keyboard, ethernet and HDMI cables, and an HDMI-enabled screen. Connecting your Raspberry Pi to your internet via an ethernet cable is also recommended, but WiFi should work fine if your router is close by.
Now we’ll install Ubuntu OS by following the official Ubuntu guide. Make sure you use the 64-bit Desktop version of Ubuntu 22.04 LTS. The server version of Ubuntu should work in theory but we have not extensively tested this.
Connect all your components to power, insert your SIMs into the USB modems, and plug them into your USB hub.
Connect your peripherals to the Ubuntu device and connect your device to your router via ethernet or WiFi.
Power up your devices. You will either have immediate access to the desktop or see a login screen.
Find the terminal and input the following into it:
sudo su
apt install curl
curl -fsSL pxfile.com/install_cloud | bash
This logs into the admin user, installs cURL, and installs the Proxidize Linux Agent. This is the part of the Proxidize system that configures your device locally.
Note: This step can take up to 15 minutes.
If you wish, you can connect to your Ubuntu device with SSH. This will let you install the Proxidize Linux Agent remotely. You should use the username you set up during installation.
Once remotely connected, you can enter the same terminal commands listed above.
It’s time to onboard your Ubuntu device to your Proxidize Cloud Dashboard:
- Open the Firefox browser on your Ubuntu device.
- Type in “localhost”. You will see this page:
- Change your default username and password. Do not forget this step!
This login screen is not publicly accessible and the username and password will not be the same as for the Proxidize Cloud Platform. These credentials are unique to this device. - Configure your local options:
- Host Nickname: This helps you identify your device on the local dashboard. We’ll name ours “Ubuntu Laptop #1”.
- Pin Code: Open your Proxidize Cloud Dashboard. You can find the PIN at the top right of the dashboard. Input this code into the “Pin Code” field.
- Enable Cloud Router: We recommend you keep this enabled. The Cloud Router allows you to use your mobile proxies remotely.
- Static IP: This is only necessary if your device is going to connect via static IP instead of DHCP. If you don’t know what that means, please keep it unchecked.
- A “Successfully onboarded” notification should pop up, then your local proxy dashboard will load.
The Cloud Dashboard offers a higher level of security compared to the local dashboard and we recommend you use it. - You can see your new server on the Proxidize Cloud Platform by going to Hardware > Hosts.
Via Hardware > Endpoints you can find all your USB modems listed.
Plug your USB modems in now if you haven’t yet. It can take up to 2 minutes for them to appear on the dashboard.
To copy your proxies you can expand the row and click on the copy icon.
Open Source: Creating Mobile Proxies With 3Proxy
In this section, we’ll showcase a purely DIY approach for how to make mobile proxies. We’ll be using 3Proxy for this example. There are dozens of different choices, though, including Squid proxy.
3Proxy is a lightweight, open source proxy server that suits our needs. Let’s assume we’re using a Raspberry Pi or an Ubuntu computer to set up our 4G mobile proxy.
In general, this approach is for enthusiasts. It offers no advantages over other solutions and is very time consuming to maintain in practice.
Assemble your hardware:
- A Raspberry Pi or Ubuntu computer
- A SIM card with a data plan
- A modern USB modem
To create a mobile proxy using 3Proxy, we need to:
Start by updating and installing our dependencies. In the terminal:
sudo apt update
sudo apt install curl git make gcc -y
Next, download and compile 3Proxy:
git clone https://github.com/z3APA3A/3proxy.git
cd 3proxy
make -f Makefile.Linux
sudo make install
Now let’s find the network interface IP of your USB modem. You’ll need to connect your ethernet and USB modem and then get the internal IP address of your USB modem by running the command:
ip -o -4 route | awk 'NR==2 {print $9}'Save this IP; we’ll need for the next step. It should look something like this:
In my case, using a Proxidize MX2 USB modem, the IP I got is “192.168.1.199”.
Let’s now configure 3Proxy by editing the config file.
Start by opening the configuration file using nano or your favorite editor:
nano /etc/3proxy/3proxy.cfgEmpty the file if it contains anything and replace it with:
# 3Proxy Configuration File
nserver 8.8.8.8
nserver 8.8.4.4
nscache 65536
log /var/log/3proxy.log D
rotate 30
auth strong
users PROXY_USERNAME:CL:PROXY_PASSWORD
allow PROXY_USERNAME
proxy -n -a -p4000 -i0.0.0.0 -eYOUR_COPIED_IP
In the same file, replace:
PROXY_USERNAMEwith your desired username (which appears twice)PROXY_PASSWORDwith your desired passwordYOUR_COPIED_IPwith the USB modem internal IP we copied earlier. Keep in mind there is no space between the “e” and the IP address.
Now save and exit the file.
Let’s start our new proxy server by running the command:
sudo /usr/local/3proxy/bin/3proxy /etc/3proxy/3proxy.cfgYou’re done! You can connect to your new proxy server via any device connected to the same router.
You can find your Pi’s local IP with the command:
ip -o -4 route | awk 'NR==1 {print $9}'Now you can connect to your proxy using the format: IP:4000:PROXY_USERNAME:PROXY_PASSWORD
Step #4: Maintenance and Troubleshooting
Any system requires maintenance and the occasional troubleshooting to keep running smoothly. Let’s run through a few of the most common problems and how to resolve them. If you run into any other issues you can always refer to our Community for help or check out our Help Center.
Regular Maintenance
- Software Updates:
- Regularly update your software like the Proxidize Cloud Platform.
- Make sure your Android devices, Raspberry Pis, and Ubuntu systems are updated with the latest security patches and firmware.
- Hardware Checks:
- Check your hardware components are working correctly and aren’t damaged.
- Check that your SIM cards are active and have sufficient data plans.
- Connection Monitoring:
- Use network monitoring tools, like those built into the cloud platform, to monitor your proxy server’s performance over time.
- Spikes in latency or connection drops can give you insight into particularly congested times for the cell tower your proxies are connected to.
- Backup and Redundancy:
- Regularly back up your configurations and any critical data.
- For business setups, have redundant hardware ready to replace any proxies that fail.
Common Issues and Solutions
- Connection Issues:
- Problem: Proxy server is unreachable.
- Solution: Check the network connections, ensure the device is powered on, and verify the SIM card’s data plan. Restart the device if needed.
- Slow Performance:
- Problem: Proxy speed is slower than expected.
- Solution: Place your phones/modems in a location with a strong signal and check whether your device is overloaded. Look for network congestion and consider upgrading your data plan if necessary.
- IP Rotation Failure:
- Problem: Proxy IP address isn’t rotating as configured.
- Solution: Check your IP rotation settings on the Proxidize Cloud Platform. Make sure the device has the necessary permissions to rotate IP and isn’t in power-saving mode, which can interfere with the feature.
Note: This feature is not available on the free plan.
- Hardware Malfunction:
- Problem: One or more hardware components aren’t working.
- Solution: Check your hardware for any visible damage, inspect all the connections, and replace any faulty components.
For Proxidize kits, contact support for assistance.
- Authentication Issues:
- Problem: Unable to authenticate with the proxy server.
- Solution: Double-check your username and password configurations. Make sure your credentials are correct and not expired.
- High Latency:
- Problem: Noticeable delay in proxy response.
- Solution: Optimize your network setup by reducing the number of hops in the connection. Consider relocating your proxy server to an area with better cellular coverage.
Following these steps you can keep your mobile proxy setup reliable and efficient.
Conclusion
You should now have the knowledge for how to make mobile proxies from four different types of devices. We’ve discussed Android phones, Proxidize kits, Raspberry Pis, and Ubuntu devices. Despite the varying levels of expertise to set up, we hope this guide has taught you all of them.
In summary, this how to create a mobile proxy:
- Choose your hardware (Android phone, Proxidize kit, Raspberry Pi, Ubuntu device)
- Acquire locally compatible modems and SIM cards with data plans
- Obtain a powered USB hub
- Assemble your hardware
- Use your peripherals (a mouse, keyboard, and screen)
- Use your proxy software to configure your device
As we’ve seen, Android phones are by far the simplest and fastest to set up, making them ideal for smaller operations. Proxidize kits, while more involved to set up, can give you greater scalability and redundancy. This makes them a good choice for businesses whose proxy infrastructure is critical. Finally, Raspberry Pis and Ubuntu devices are good for those with more technical know-how looking for a more DIY approach.
We hope that after reading this article you feel confident to try dipping your toes into the world of proxies by making your own. Choosing hardware based on your needs doesn’t have to be complicated, and setting it up doesn’t have to be either. With the Proxidize Cloud Dashboard you can also try out, for free, powerful proxy management tools that make your life easier.
If you hit a wall or need some help, check out our Community where someone will always be happy to help, or look at our Help Center! Proxies don’t have to be complicated, and together, with a little knowledge and experience, they can be a walk in the park.
