There are many languages and libraries available to perform a web scraping project however, if you wish to perform a large-scale project, then using Scrapy web scraping could be the best choice. It is a library designed specifically to handle large-scale scraping projects due to its easy accessibility and extendable framework. This article aims to explain what Scrapy is, and provide a breakdown of how to use it with a step-by-step Scrapy tutorial. Finally, it will include some advanced Scrapy techniques and offer tips and tricks on perfecting your techniques.

What is Scrapy?
Scrapy is an open-source library built for Python and works on an asynchronous networking engine called Twisted. What this means is that it uses an event-driven networking infrastructure and allows for higher efficiency and scalability. Scrapy comes with an engine called Crawler that handles low-level logic such as HTTP connection, scheduling, and entire execution flow. For high-level logic tasks, Scrapy offers up Spiders which will handle the scraping logic and performance. Users would need to provide the Crawler with a Spider object to generate request objects, parse, and retrieve the data to store.
Requests is used for HTTP requests, BeautifulSoup is used for data parsing, Selenium is most common with JavaScript-based websites, and Scrapy offers all of these in one convenient library.
Here are some common Scrapy terms:
- Callback: Due to Scrapy’s asynchronous framework, most of the actions are executed in the background. This allows for concurrent and effective logic. Callback is a function that’s attached to a background task.
- Errorback: Similar to Callback, this is triggered when a task fails instead of when it succeeds.
- Generator: Functions that return results one at a time instead of all at once.
- Settings: Located in the settings.py file of the project and is Scrapy’s central configuration object.
Scrapy includes some unique features that make it more powerful than other libraries used for scraping. These include HTTP connections, support for CSS selectors and XPath selectors, the ability to store data on FTP, S3, and a local file system, cookie and session management, JavaScript rendering with Scrapy Splash, and built-in crawling capabilities.
With the basic information of Scrapy out of the way, it is time to start building the environment for a scraping project.

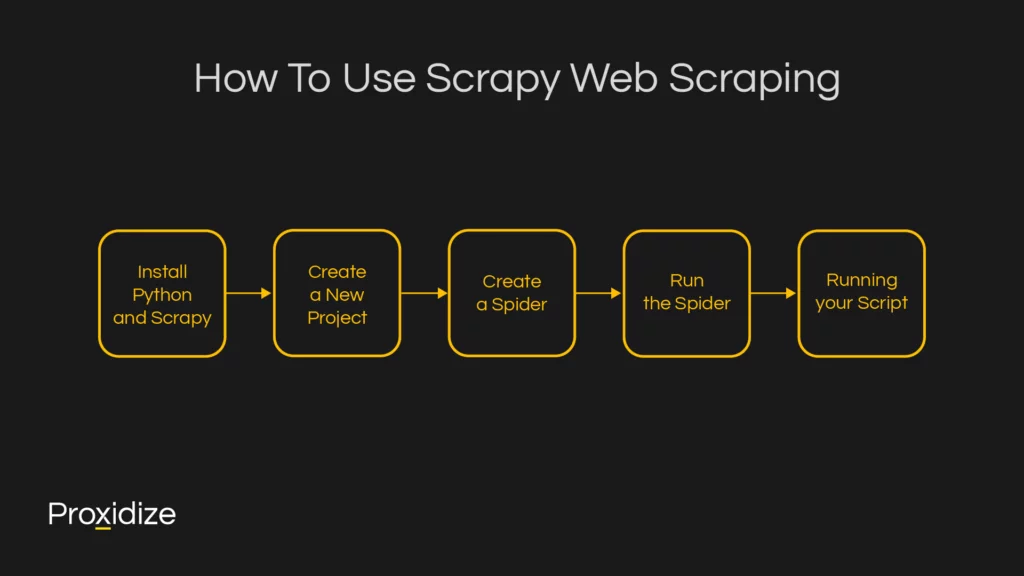
How To Use Scrapy Web Scraping
Install Python and Scrapy
Before starting a Scrapy project, you must ensure that you have Python installed. This can be done easily by visiting the Python website and downloading the latest version. Once that is complete, open a terminal and use the pip command to install Scrapy:
pip install scrapyCreate a New Project
Now that you have the library installed, the next step is to create a new project. Come up with a name for your project, for this example, we will simply name the project “scraping_example”. Enter the following command in your terminal:
scrapy startproject scraping_example
This will create a list of files for your project that you will use to control the Scrapy spiders, settings, and so on. This will look like this:
├── scraping_example
│ ├── __init__.py
│ ├── items.py
│ ├── middlewares.py
│ ├── pipelines.py
│ ├── settings.py
│ └── spiders
│ ├── __init__.py
└── scrapy.cfg
Items.py is a model for the extracted data. It can be customized to inherit the Scrapy item class. Middlewares.py changes the request/response lifecycle. Pipelines.py processes the extracted data, cleans the HTML, validates the data, and exports it into a customer format or saves it onto a database. /spiders contains basic Spider classes. Basic Spiders are classes that define how a website should be scraped such as which links to follow and how to extract the data. Scrapy.cfg is the configuration file for the project’s main settings.
Create a Spider
To create a spider, you would need to navigate to the spider directory inside your project:
cd scraping_example/spidersNext up, you would need to create a Python file and input which information needs to be scrapped. For the example below, we will be using the website ‘quotes.toscrape’ and gathering the text, author, and tags:
import scrapy

class ExampleSpider(scrapy.Spider):

    name = "example"

    start_urls = [

        'http://quotes.toscrape.com/',

    ]

    def parse(self, response):

        for quote in response.css('div.quote'):

            yield {

                'text': quote.css('span.text::text').get(),

                'author': quote.css('span small::text').get(),

                'tags': quote.css('div.tags a.tag::text').getall(),

            }

        next_page = response.css('li.next a::attr(href)').get()

        if next_page is not None:

yield response.follow(next_page, self.parse)Run the Spider
Finally, you need to run the Spider and enter the website you wish to scrape. The spider will crawl the website and find the necessary information. Additionally, you could add a method for saving the project such as a JSON or a CSV:
scrapy crawl (website name) -o output.jsonRunning your Script
The final step is to run your script. With all the information entered above including choosing the website to scrape, the exact information you wish to retrieve, and the method of saving, all you need to do is input the code to start running the script.
from scrapy.crawler import CrawlerProcess
from project.spiders.test_spider import SpiderName
process = CrawlerProcess()
process.crawl(SpiderName, arg1=val1,arg2=val2)
process.start()With that, your script should run and crawl the information you need without worry. Here is the full script including all the information you would need. You could take this script and use it but remember to change the necessary information to what you wish to scrape.
In the terminal, enter these lines:
pip install scrapy
scrapy startproject scraping_example
cd scraping_example/spidersThen in your main reader, enter this script:
import scrapy

class ExampleSpider(scrapy.Spider):

    name = "example"

    start_urls = [

        'http://quotes.toscrape.com/',

    ]

    def parse(self, response):

        for quote in response.css('div.quote'):

            yield {

                'text': quote.css('span.text::text').get(),

                'author': quote.css('span small::text').get(),

                'tags': quote.css('div.tags a.tag::text').getall(),

            }

        next_page = response.css('li.next a::attr(href)').get()

        if next_page is not None:

            yield response.follow(next_page, self.parse)
scrapy crawl (website name) -o output.json
from scrapy.crawler import CrawlerProcess

from project.spiders.test_spider import SpiderName

process = CrawlerProcess()

process.crawl(SpiderName, arg1=val1,arg2=val2)

process.start()Tips and Tricks
One of the most vital steps when it comes to web scraping with any language or library is ensure you are using a proxy. Using a proxy adds an extra layer of security as it hides your IP address and rotates between different IPs, allowing your actions to remain hidden from a website and lessening IP bans. Implementing a proxy within a Scrapy script is simple and requires only a few extra lines of code. This section will discuss some methods by which this can be done.
Add a Meta Parameter
The first step to adding your proxy is to distinguish a meta parameter using the scrapy.requests method.
yield scrapy.Request(

url,

callback=self.parse,

meta={'proxy': 'http://<PROXY_IP_ADDRESS>:<PROXY_PORT>'}

)Simply enter the proxy IP and port within the labeled space and you will be good to go.
Create a Custom Middleware
Once a middleware is specified, every request will be routed through it. Scrapy’s middleware is a layer that intercepts requests. This helps when working on a larger project that involves multiple spiders.
Extend the proxyMiddleware class and add it to the settings.py file. This can be done as such:
class CustomProxyMiddleware(object):

    def __init__(self):

        self.proxy = 'http://<PROXY_IP_ADDRESS>:<PROXY_PORT>'

    def process_request(self, request, spider):

        if 'proxy' not in request.meta:

            request.meta['proxy'] = self.proxy

    def get_proxy(self):

return self.proxyFinally, add the middleware to the DOWNLOAD_MIDDLEWARE settings in the settings.py file:
class CustomProxyMiddleware(object):

    def __init__(self):

        self.proxy = 'http://<PROXY_IP_ADDRESS>:<PROXY_PORT>'

    def process_request(self, request, spider):

        if 'proxy' not in request.meta:

            request.meta['proxy'] = self.proxy

    def get_proxy(self):

return self.proxyUsing either of these methods would help input your proxy within the code and make your scraping efforts smooth.
You must keep in mind that if you wish to use proxies, you must enter either line of code under the def prase statement. As an example, it would look like this:
def parse(self, response):

        for quote in response.css('div.quote'):

            yield {

                'text': quote.css('span.text::text').get(),

                'author': quote.css('span small::text').get(),

                'tags': quote.css('div.tags a.tag::text').getall(),

            }

        next_page = response.css('li.next a::attr(href)').get()

        if next_page is not None:

            yield scrapy.Request(

                response.urljoin(next_page),

                callback=self.parse,

                meta={'proxy': 'http://<PROXY_IP_ADDRESS>:<PROXY_PORT>'}

)Conclusion
Scrapy is a wonderful library to use if your scraping projects are bigger than expected. If you have an understanding of Python, it should be quite simple to pick up. Using the guide provided in this article, you should be able to build your scraping script quite easily as well as implement a proxy within the code. If you wish to add an extra layer of protection, consider using an antidetect browser to truly keep all your details hidden and use web scraping with Scrapy comfortably and without any distractions.


