Previously, we discussed the basics of web scraping as well as breaking down how to scrape using Python, BeautifulSoup, pyQuery, and introduced some powerful tools for scraping. This article will cover one of the most popular programming languages: JavaScript.
Throughout this guide, we will cover how web scraping with JavaScript compares to other programming languages as a tool for scraping, provide a step-by-step process on how to set up and start web scraping with JavaScript including data handling and storage methods, and some ways to enhance your scraping projects.
What is JavaScript?
JavaScript is a powerful programming language that is mostly used for dynamic websites as it holds the ability to work with and manipulate HTML and CSS content. Another advantage it holds is that it could create and control dynamic website content such as forms and animations, giving it an edge over other languages with Python.
Main Libraries
JavaScript includes many libraries that help it perform the tasks it needs to do. For the purposes of learning about web scraping with JavaScript, we will explore three libraries that assist with scraping, those being Cheerio, Puppeteer, and Axios.
Cheerio allows developers to parse and manipulate HTML and XLM documents. This allows a user to find the exact website URLs they need to scrape to gather the information they need. Cheerio is fast and supports CSS selectors, making it ideal for web scraping. Puppeteer provides high-level API to control headless browsers such as Chrome. It is used for scraping dynamic content, automating form submissions, and taking screenshots. It supports JavaScript, CSS3, and HTML5. Axois allows users to make requests to websites and servers. Instead of presenting the results visually, it presents them through code, allowing users to manipulate the response easier.
Comparison with Other Coding Languages
While JavaScript is a powerful web scraping language, it is not the only language capable of handling scraping projects. This section will compare Python, Ruby, and PHP and balance out their strengths and weaknesses against JavaScript.
Python is a simple and easy to read language and is excellent for beginners just starting off with scraping. It offers popular libraries such as BeautifulSoup (we have written an article detailing how to perform Web Scraping with Beautiful Soup). It has powerful data analysis and a large community support to assist anyone with any problems or issues they encounter. However, it is slower than JavaScript and requires some additional tools when handling JS-heavy websites.
Ruby offers elegant and concise syntax and offers its own personal libraries such as Nokogiri and Watir which makes web scraping more straightforward. When compared to JavaScript, it does tend to run slower and is a less popular scraping language than Python or JS.
PHP is simple and offers strong support for server-side scraping. It similarly offers scraping-specific libraries such as cURL and Simple HTML DOM. One of its downsides is that it is less efficient for client-side scripting and is not as robust for handling multiple tasks.
Now that we have covered a basic understanding of JavaScript and how it compares to other programming languages, it is time to start writing a script for web scraping with JavaScript. The next section will break down the script into parts that will allow you to understand why each line of code needs to be written and what function it possesses.
Setting Up and Using Web Scraping with JavaScript
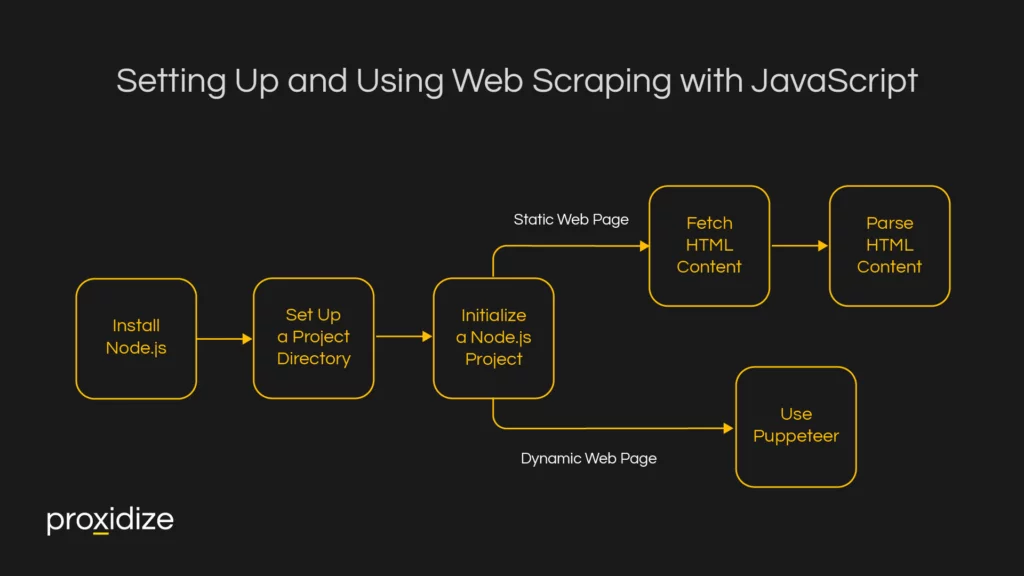
There are a few preliminary tasks you must perform before you begin web scraping. For starters, you would need to set up your coding environment and set up a project directory that will organize your code and dependencies, and you would need to start a Node.js project so you can begin writing in JavaScript.
Setting Up the Environment
Step 1: Install Node.js
The very first step you would need to follow is installing a JavaScript runtime environment onto your device. This will allow you to perform web scraping tasks. It can be done by visiting the JavaScript website and downloading the latest version that is appropriate to your device specifications. After you have downloaded the file, open your terminal or command prompt and type in “node -v” to ensure it has been installed correctly and is ready to go.
Step 2: Set Up a Project Directory
Next up, you would need to create a new directory. This will help organize your code and dependencies. You can do this by typing in the following prompt:
mkdir web-scraping-js
cd web-scraping-jsStep 3: Initialize a Node.js Project:
The last step of the initial setup involves creating a package.json file to manage your project on. This is done by writing the following prompt into your terminal or command prompt.
npm init -yWriting a Web Scraping Script
Now that you have your set up taken care of, it is time to start web scraping with JavaScript. For the purposes of this article, we will be providing an example of scraping using the libraries Axios and Cheerio:
Scraping Static Web Pages
1. Fetch HTML Content:
const axios = require('axios');

async function fetchHTML(url) {
  try {
    const { data } = await axios.get(url);
    return data;
  } catch (error) {
    console.error(`Error fetching HTML: ${error}`);
    throw error; // Rethrow the error to ensure calling functions can handle it
  }
}

module.exports = fetchHTML; // If you want to use this function in other files 2. Parse HTML Content:
const axios = require('axios');
const cheerio = require('cheerio');

// Function to fetch HTML
async function fetchHTML(url) {
  try {
    const { data } = await axios.get(url);
    return data;
  } catch (error) {
    console.error(`Error fetching HTML: ${error}`);
    throw error; // Rethrow the error to ensure calling functions can handle it
  }
}

// Function to scrape data
async function scrapeData(url) {
  try {
    const html = await fetchHTML(url);
    const $ = cheerio.load(html);

    // Example: Extracting titles from a blog
    const titles = [];
    $('h2.post-title').each((index, element) => {
      titles.push($(element).text());
    });

    console.log(titles);
  } catch (error) {
    console.error(`Error scraping data: ${error}`);
  }
}

// Example URL
scrapeData('https://example-blog.com');Scraping Dynamic Web Pages
For dynamic web pages that load content via JavaScript, Puppeteer is an excellent tool:
Launching the Browser and Navigate to Page:
const puppeteer = require('puppeteer');

async function scrapeDynamicContent(url) {
  let browser;
  try {
    browser = await puppeteer.launch();
    const page = await browser.newPage();
    await page.goto(url, { waitUntil: 'networkidle2' });

    // Example: Extracting titles from a blog
    const titles = await page.evaluate(() => {
      return Array.from(document.querySelectorAll('h2.post-title')).map(el => el.innerText);
    });

    console.log(titles);
  } catch (error) {
    console.error(`Error scraping dynamic content: ${error}`);
  } finally {
    if (browser) {
      await browser.close();
    }
  }
}

// Example URL
scrapeDynamicContent('https://example-dynamic-blog.com'); 
Data Handling and Storage
Once you’ve scraped everything, you would need a way to handle and store the data. This will help you stay organized and keep your data accessible and usable for analysis. We will be covering the lines of code you need to include within your script to ensure your data is saved in either JSON, CSV, or a collection of databases, depending on your specific need.
If you wish to store your data hierarchically, we suggest you store them as JSON files. If you wish to store the data in organized tables, CSV would be your best bet. However, if you have complex and larger-scale data, it is recommended to store them in database tables such as MySQL or NoSQL.
Storing Data in Files
Here is the code required to store data in your preferred format, depending on the size of your scraping project.
For JSON:
const fs = require('fs').promises;

const data = [
  { title: 'Post 1', author: 'Author 1', date: '2024-08-02' },
  { title: 'Post 2', author: 'Author 2', date: '2024-08-03' },
];

async function writeDataToFile() {
  try {
    await fs.writeFile('data.json', JSON.stringify(data, null, 2));
    console.log('Data has been written to JSON file.');
  } catch (err) {
    console.error('Error writing to file', err);
  }
}

writeDataToFile(); For CSV files:
const fs = require('fs').promises;
const { parse } = require('json2csv');

const data = [
  { title: 'Post 1', author: 'Author 1', date: '2024-08-02' },
  { title: 'Post 2', author: 'Author 2', date: '2024-08-03' },
];

const csv = parse(data);

async function writeDataToCSV() {
  try {
    await fs.writeFile('data.csv', csv);
    console.log('Data has been written to CSV file.');
  } catch (err) {
    console.error('Error writing to CSV file', err);
  }
}

writeDataToCSV();
For MySQL:
const mysql = require('mysql2/promise');

const data = [
  ['Post 1', 'Author 1', '2024-08-02'],
  ['Post 2', 'Author 2', '2024-08-03'],
];

async function insertData() {
  const connection = await mysql.createConnection({
    host: 'localhost',
    user: 'root',
    password: 'password',
    database: 'web_scraping',
  });

  try {
    const query = 'INSERT INTO posts (title, author, date) VALUES ?';
    const [result] = await connection.query(query, [data]);
    console.log('Data has been inserted into the database.');
  } catch (err) {
    console.error('Error inserting data into the database:', err);
  } finally {
    await connection.end();
  }
}

insertData();
For NoSQL:
const { MongoClient } = require('mongodb');

const url = 'mongodb://localhost:27017';
const client = new MongoClient(url);

async function run() {
  try {
    await client.connect();
    console.log('Connected to MongoDB');

    const database = client.db('web_scraping');
    const collection = database.collection('posts');

    const data = [
      { title: 'Post 1', author: 'Author 1', date: '2024-08-02' },
      { title: 'Post 2', author: 'Author 2', date: '2024-08-03' },
    ];

    const result = await collection.insertMany(data);
    console.log(`${result.insertedCount} documents were inserted.`);
  } catch (err) {
    console.error('An error occurred while inserting documents:', err);
  } finally {
    await client.close();
    console.log('Disconnected from MongoDB');
  }
}

run().catch(err => console.error('An unexpected error occurred:', err));
Enhancing Web Scraping with JavaScript
There are a few things to keep in mind that could make web scraping with JavaScript easier and more efficient. One of the biggest challenges most web scrapers face is getting their IP blocked. This could be due to a heavy amount of requests being sent to the website. When a website notices this, they will automatically ban the IP at risk of having their servers overloaded and risk shutting the website down. Similarly, not every website is fond of web scraping. To ensure the website is comfortable with scraping or at the very least, to find out which information a website is comfortable being scraped, you should check the robot.txt rules. You can find this out by typing the slug “robots.txt” to your website URL (eg: www.google.com/robot.txt).
As for the IP bans, it is highly recommended that you use a proxy server, specifically a mobile proxy server. By using a proxy, your real IP address will remain hidden, allowing you to scrape without the risk of the IP address being detected, causing the website to ban you from accessing its content. The reason we specify a mobile proxy is that mobile proxy IPs have the lowest chance of being detected as they ping the connection off of cell towers which have a slew of IP addresses being used by many people and the risk of banning one of these IP addresses could risk preventing a potential customer from accessing the website. Most mobile proxy providers additionally offer a rotating IP option which would come in handy when web scraping as with a rotating IP, the scraped website would be unable to detect that a single user is performing the scraping action. This would ensure that your scraping tasks remain undetected as you gather all the pieces of information you desire.
Conclusion
Web Scraping with JavaScript is fairly straightforward once you understand the core components that make JavaScript an excellent language. This includes its ability to work with dynamic websites and its asynchronistic programming which allows you to multitask your scraping and use heavily documented libraries such as Axios, Cheerio, and Puppeteer. However, knowing how to scrape is only half the challenge. To scrape data without being blocked or detected, you could incorporate a mobile proxy to help hide and rotate your IP, thus making your actions seem as though the requests are coming from multiple users.
With this guide, you should have gained an understanding of how to implement code for web scraping with JavaScript with a way to store your data in your preferred method. However, if you are a beginner, JavaScript does have a learning curve. If you wish to practice scraping in another language before tackling JavaScript, we recommend you check out our article on Web Scraping with Selenium and Python which should provide a base-level understanding of the functionality and framework of scraping. Once you find yourself more comfortable scraping with Python, you could return to this article and test yourself with one of the most popular and powerful programming languages available.


